 Save
Save My cousin called me in a panic two weeks before her graduation, asking if I could whip up something special for her backyard celebration. I'd never made graduation cupcakes before, but watching her describe the perfect little mortarboard toppers she'd imagined—perched right on top like tiny edible achievements—I knew I had to try. What started as a quick Pinterest scroll turned into the most fun baking project, complete with melted chocolate mishaps and my nephew sneaking candies when he thought I wasn't looking. These cupcakes became the unexpected stars of the party, with guests actually asking for the recipe instead of just eating and moving on.
I still remember the moment my cousin bit into one of these and her eyes lit up—not just because they tasted good, but because someone took the time to make something that actually matched the milestone she was celebrating. That's when I realized these cupcakes were never really about the ingredients or even the technique; they were about showing up for someone's big moment with something homemade and thoughtful.
Ingredients
- All-purpose flour (1 1/2 cups): This is your foundation, and measuring by weight instead of volume makes a huge difference in consistency—I learned that lesson after one batch came out dry.
- Granulated sugar (1 cup): Don't skip the creaming step; it incorporates air that keeps these cupcakes tender and light rather than dense.
- Unsalted butter (1/2 cup for batter, 1/2 cup for frosting): Softened butter is non-negotiable here—cold butter won't cream properly and you'll waste energy trying.
- Large eggs (2): Room temperature eggs blend more smoothly into the batter, creating better texture throughout.
- Whole milk (1/2 cup for batter, 2 tbsp for frosting): The milk keeps the crumb moist and prevents the cupcakes from tasting like dry cake the next day.
- Baking powder (1 1/2 tsp): This is what gives the cupcakes their gentle rise, so check that yours isn't expired before you start.
- Salt (1/4 tsp plus pinch): A tiny pinch in both the batter and frosting enhances all the other flavors without tasting salty.
- Pure vanilla extract (1 1/2 tsp plus 1 tsp): The real stuff matters here; imitation extract tastes flat in comparison.
- Powdered sugar, sifted (2 cups): Sifting removes lumps and makes your frosting silky smooth, which is worth those extra thirty seconds.
- Mini peanut butter cups (12): These form the base of your graduation cap, but have chocolate squares ready as a nut-free swap if needed.
- Chocolate square candies like Ghirardelli (12): These sit flat and look exactly like a mortarboard, which is why they work so perfectly.
- String licorice or sour candy strips (12 pieces): The tassel that hangs down is what makes people immediately recognize these as graduation caps.
- Mini M&Ms or candy pearls (12): These tiny candies become the buttons on top of the cap and add a playful finishing touch.
- Melted chocolate or frosting: This acts as your edible glue, holding all the cap pieces together while everything sets.
Tired of Takeout? 🥡
Get 10 meals you can make faster than delivery arrives. Seriously.
One email. No spam. Unsubscribe anytime.
Instructions
- Get Your Oven Ready:
- Preheat to 350°F and line your muffin tin with paper liners—this step takes two minutes but prevents the frustration of cupcakes sticking later. I learned to do this first so I'm never scrambling once the batter is mixed.
- Cream the Butter and Sugar:
- Beat the softened butter with sugar for about two minutes until it looks pale and fluffy, which means you've incorporated enough air for a tender crumb. You'll know it's ready when it resembles whipped cream.
- Add the Eggs and Vanilla:
- Mix in one egg at a time, beating well after each addition, then stir in the vanilla until everything is smooth and combined. This helps the batter emulsify properly instead of looking curdled.
- Combine Dry Ingredients Separately:
- Whisk together flour, baking powder, and salt in another bowl so the leavening distributes evenly throughout the batter. Sifting isn't required but does improve the final texture.
- Layer the Wet and Dry Together:
- Add half the dry mixture, mix gently, pour in the milk, then add the remaining dry ingredients, stirring just until combined. Overmixing develops gluten and makes cupcakes tough, so resist the urge to blend everything into submission.
- Fill and Bake:
- Divide batter evenly among liners, filling each about two-thirds full, then bake for 18 to 20 minutes until a toothpick inserted in the center comes out clean. The kitchen will smell incredible, and this is where the hardest part begins—waiting.
- Cool Completely Before Frosting:
- Let the cupcakes cool in the tin for ten minutes, then transfer to a wire rack and wait until they're completely cool before frosting, or your buttercream will melt. Impatience here will ruin everything you've worked for, so put on a show or read a book while you wait.
- Make the Buttercream:
- Beat softened butter until smooth, gradually add sifted powdered sugar a little at a time to avoid a cloud of sugar dust, then mix in milk, vanilla, and salt until you reach a fluffy, spreadable consistency. If it's too thick, add milk one teaspoon at a time; if too soft, add a bit more powdered sugar.
- Frost Each Cupcake:
- Apply a generous swirl of buttercream to each cooled cupcake using a piping bag or the back of a spoon, making sure you cover the top evenly. The frosting is your canvas for the graduation caps, so take your time here.
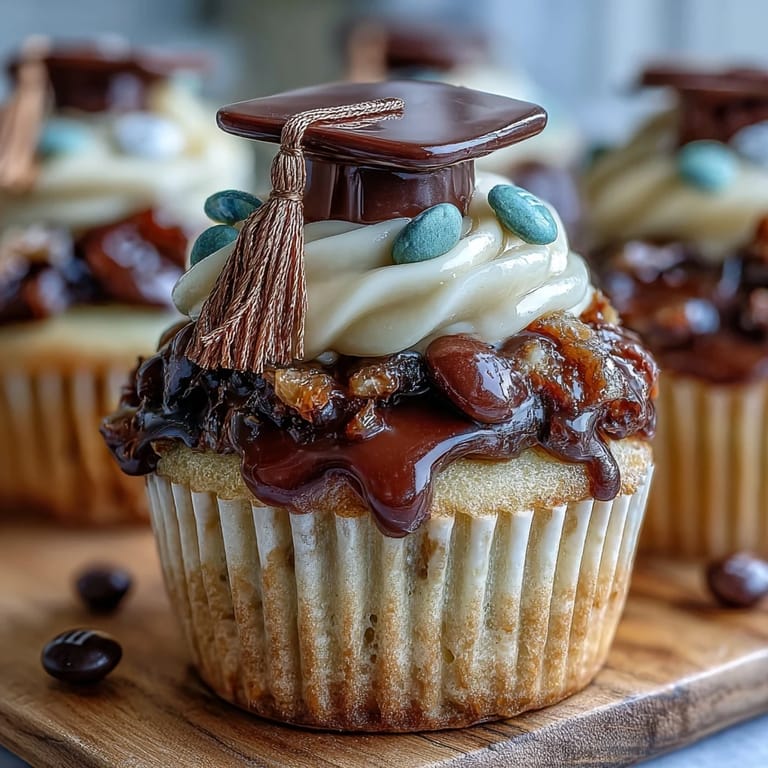
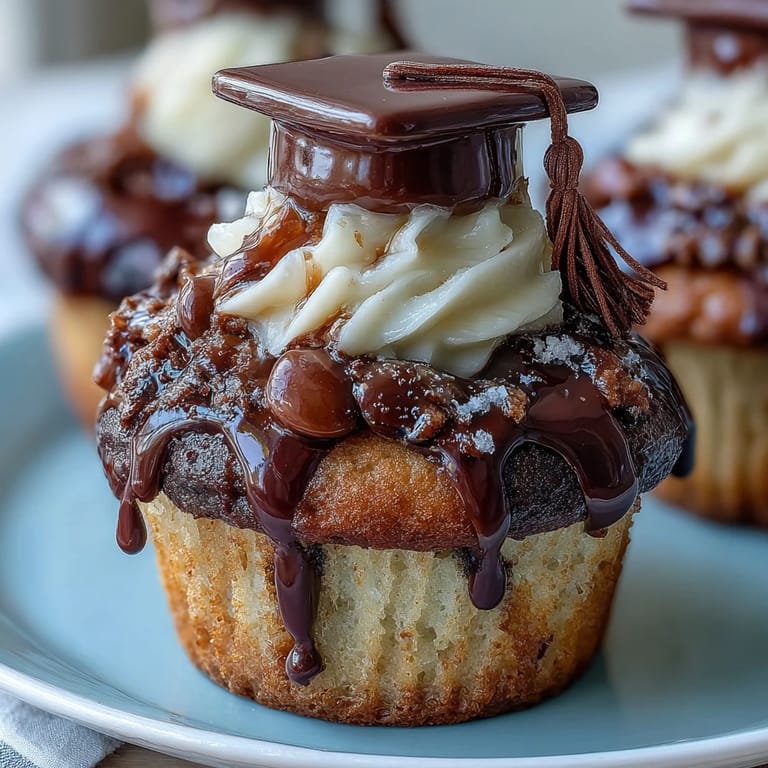
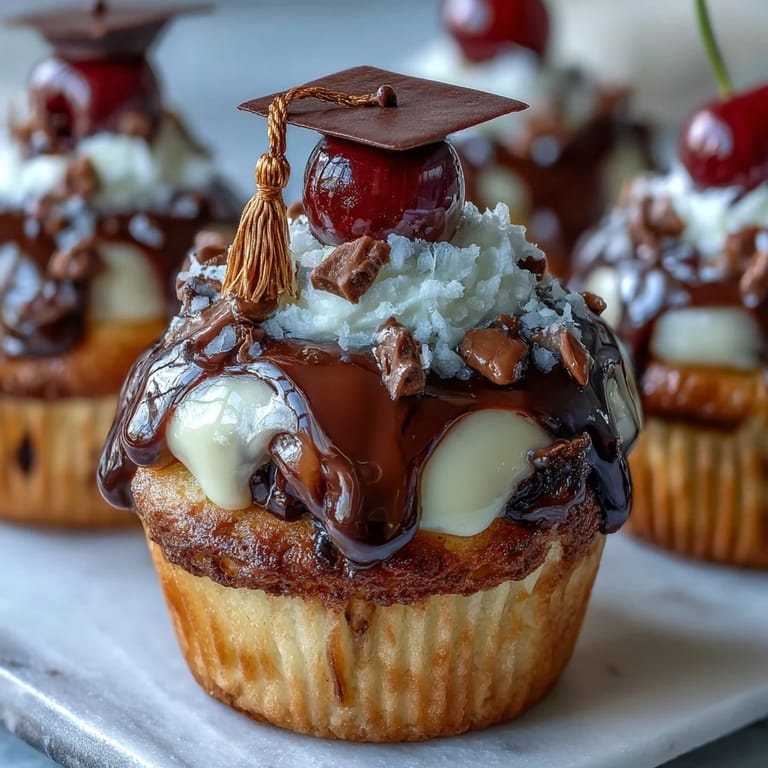
- Assemble the Graduation Caps:
- Place a chocolate square flat-side up, attach a mini peanut butter cup upside-down in the center using a dab of melted chocolate or frosting, then add the licorice tassel and candy button on top. Let everything set for at least fifteen minutes so the chocolate or frosting hardens and holds everything in place.
- Top the Cupcakes:
- Once the caps are set, gently place one on top of each frosted cupcake and step back to admire your handiwork. These are now ready to celebrate with.
 Save
Save What struck me most wasn't just that these cupcakes tasted good—it was watching my cousin's friends take photos of them before eating, and hearing people say they didn't want to ruin something that looked so perfect. That's when food becomes a memory, and that's exactly what these little mortarboards do.
Customizing for School Colors
Food coloring in the buttercream is your secret weapon for making these feel uniquely connected to the graduate's school. I added navy blue to match my cousin's university, and it transformed the cupcakes from generic to deeply personal. You can also tint the frosting to match any color combination—just add a tiny drop at a time and mix thoroughly, since food coloring concentrates quickly and one extra drop can turn your frosting an unintended shade. Some people use gel coloring instead of liquid, which gives more vibrant results without thinning out the buttercream.
Storage and Make-Ahead Strategy
These cupcakes hold up beautifully, which is ideal when you're baking for a party and need breathing room. Unfrosted cupcakes can be baked two days ahead and stored in an airtight container at room temperature, and the buttercream can be made a full day in advance and stored in the fridge. If you're assembling the caps in advance, skip the frosting and add it the morning of the event so everything stays looking fresh and perfect. I've learned that the only part that shouldn't be rushed is the final assembly—that should happen a few hours before serving so the caps are perfectly set and the frosting is at its fluffiest.
Tips for Party Success
Transport these cupcakes in a sturdy cake box rather than trying to fit them in a regular container, and keep them level on the car seat instead of on a bumpy trunk. If you're worried about the frosting melting on a warm day, assemble them just before you arrive at the celebration rather than hours ahead. The caps are the real showstopper, so don't stress about frosting perfection—people are looking at those tiny mortarboards anyway.
- Make a practice cap before the big event so you understand the assembly and timing without pressure.
- Keep melted chocolate or frosting warm in a small bowl while attaching caps, so your glue stays workable.
- Have backup candies on hand in case you drop or misplace a piece during assembly—it happens more than you'd think.
 Save
Save These cupcakes remind me that the best recipes are the ones that tell a story, and yours will tell the story of someone's achievement. Make them with joy, and they'll taste exactly as good as they look.
Recipe Q&A
- → How do I make the chocolate graduation cap toppers?
Stack a chocolate square flat-side up, attach a mini peanut butter cup upside-down in the center with melted chocolate or frosting, add a piece of licorice as a tassel, and place a mini candy pearl as the button.
- → Can I make these cupcakes nut-free?
Yes, replace the mini peanut butter cups with chocolate squares to avoid nuts in the toppers while maintaining rich flavor.
- → What is the best way to store these cupcakes?
Store in an airtight container at room temperature for up to 2 days to keep them fresh and moist.
- → Can I add color to the frosting?
Absolutely. Food coloring can be added to the buttercream to match school colors or party themes.
- → How long does the baking take?
Bake the cupcakes for 18–20 minutes at 350°F (175°C), or until a toothpick inserted comes out clean.